Setup
System Requirements
You need Matlab installed and activated on your system to use Automagic. Automagic was developed and tested in Matlab R2015b and newer releases.
Installation
- Start MATLAB.
-
Download the latest (beta) Version here: AutomagicInstaller1.4.6 (MLAPPINSTALL, 10 MB)
- Double click the file and wait until Matlab displays a dialogue box.
- Please select Install. You will be notified as soon as the installation is complete.
How to Run Automagic
- Select the APPS tab in Matlab.
- Click on the Automagic icon. You might have to expand the APPS tab to see the Automagic icon by clicking the small triangle pointing down on the far right of the APPS tab.
Basic Workflow
In this section of the manual, only the basic functionality of Automagic will be explained. This covers the basic workflow from selecting a project to rating the data. Please refer to chapters 3 to 6 for detailed information all functions within the main GUI.
- Create a new project or load an existing project.
- Preprocess the data.
- Rate data and manually select bad channels if any.
- Interpolate all manually selected channels.
- Repeat steps 3 and 4 until all data is rated.
- Note: You can not close the main gui window during the preprocessing. If you wish to stop the preprocessing at any time, you can use CTRL-C. In this case, or if by any other reason the preprocessing is stopped before being completely finished, all preprocessed files to that moment will be saved, and you can resume the preprocessing only for the files which are not preprocessed yet. After having used CTRL-C, please load your project from the main gui, by reselecting it from the list of existing projects. This will update the gui with the new preprocessed files.
- Note: Since synchronisation is rather basic, people should never work on the same project simultaneously from different devices.
The Project Panel
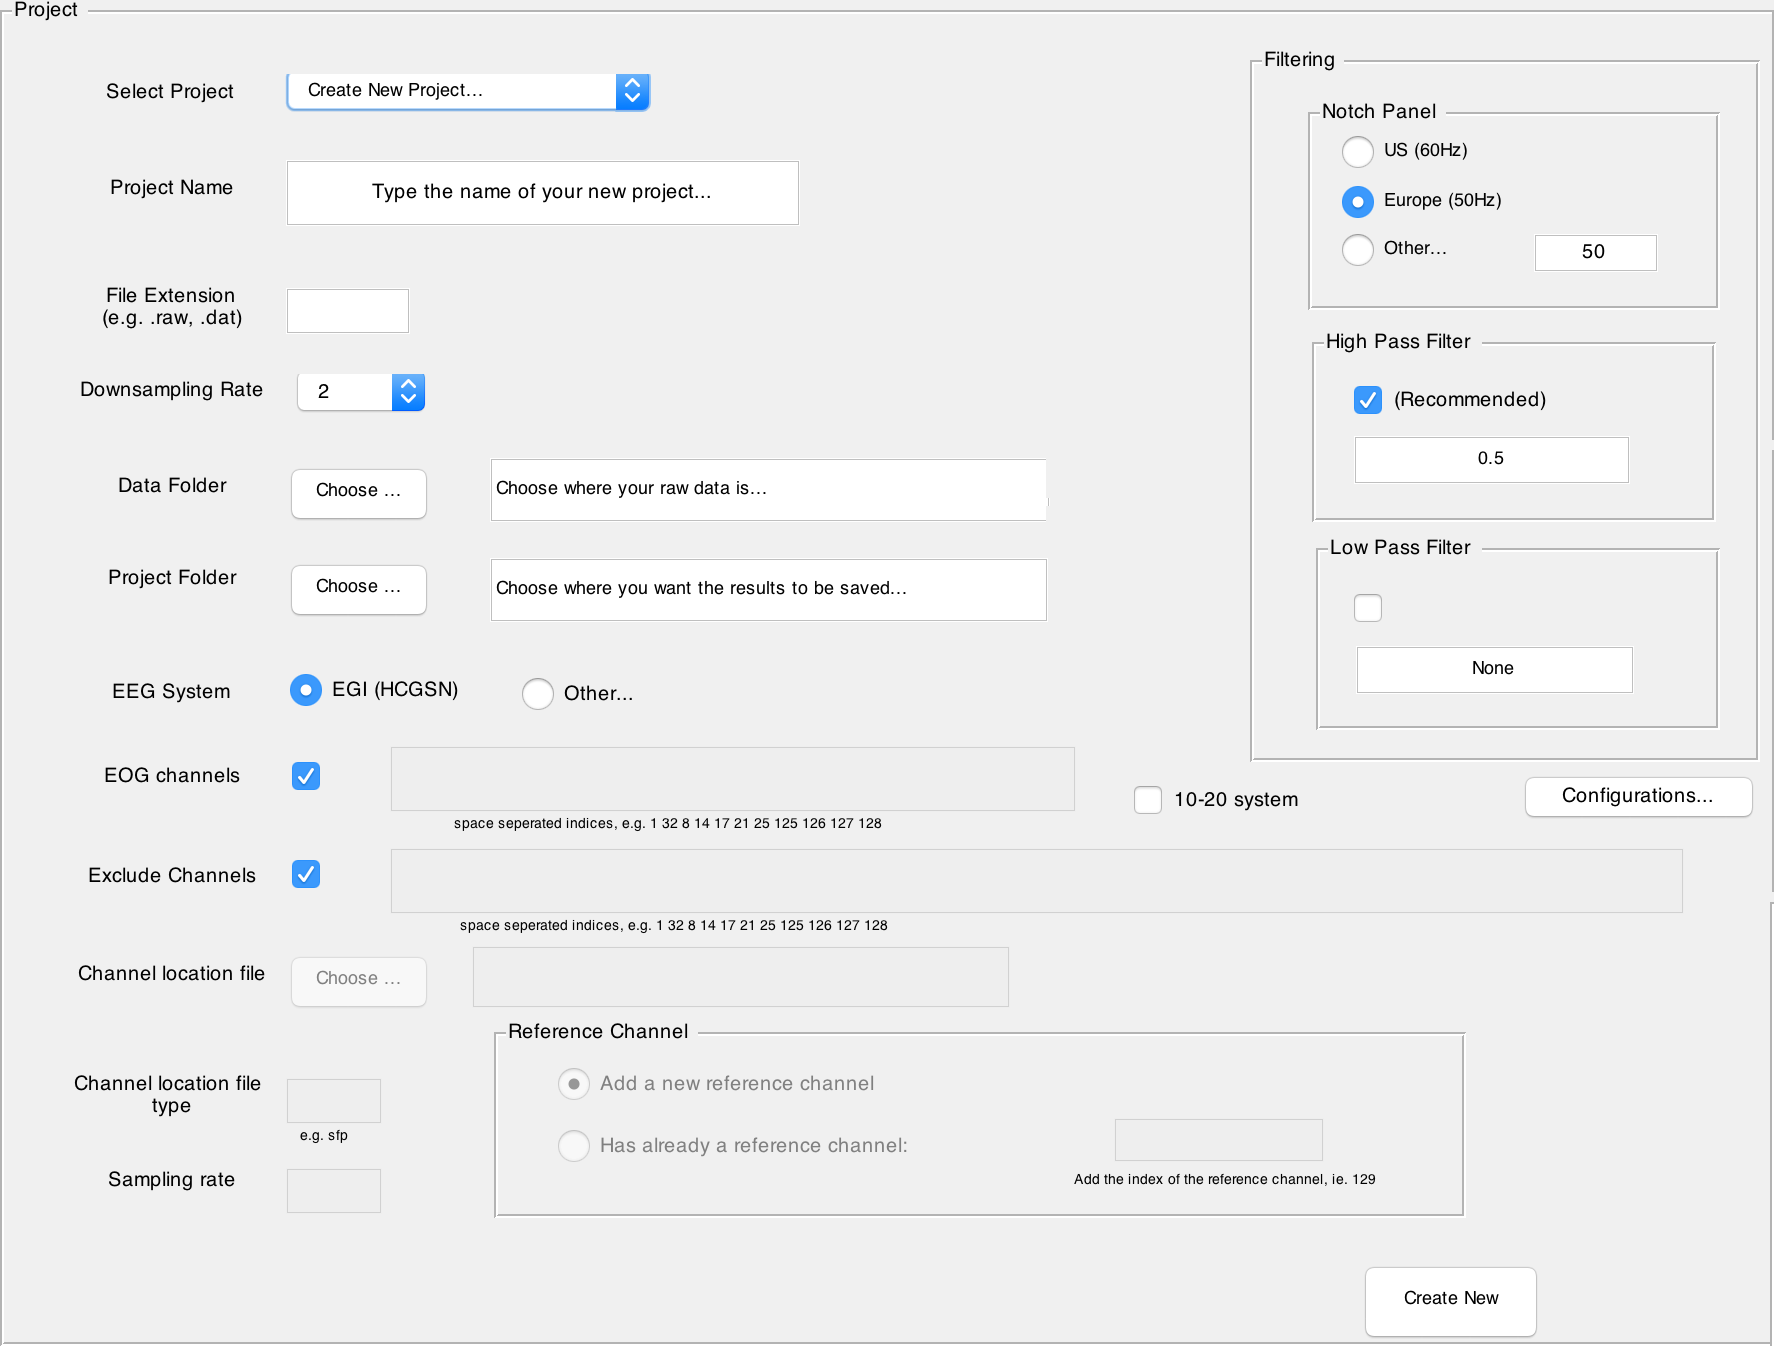
Creating a New Project
1. Navigate to the drop-down list labelled Select Project.
2. Select Create New Project...
3. Name your project.
4. Write down the file extension that corresponds to your data file format. For example raw image files (.raw or .RAW), fractal image files (.fif), generic data files (.dat) or even texts (.txt or .asc).
- In case you choose a text format (
.txt,.ascor.csv) , then an edit box below in the window is enabled so that you determine the sampling rate of you recorded data. This information is not necessary for other formats and the edit box is disabled.
5. Choose the EEG System in which your data is recorded. Currently only EGI HCGSN is fully supported for both number of channels 128 and 256 (or 129 and 257 respectively). This information is needed mainly to find channel locations. In case you choose the option Other... for your EEG System, you must provide a file in which channel locations are specified. The file format must be one which is also supported by EEGLab (pop_chanedit function). In addition, you must provide a list of indices of the EOG channels of your dataset. Note that here the list contains the indices of those channels and not their labels (You can also simply deselect the EOG regression and this step will be skipped during the preprocessing).
- The Channel location file must be the full address of the channel location file.
- The Channel location file type must specify the type of the file as required by
pop_chanedit. eg.sfp - Please note that in case you choose Other... as your EEG system, no reduction in number of channels is automatically supported. You can still add manually the list of channels that you want to be discarded from the preprocessing in Exclude Channels field.
- ICA is supported for Other... only in case your channel labels are as it is required by processMARA. They must be of the form FPz, F3, Fz, F4, Cz, Oz, etc. Otherwise the ICA is simply skipped. If only some of your labels have the required format, only those channels are considered for ICA.
- If appropriate, check the 10-20 system.
- A reference channel where all the values are 0s must be provided. If such a channel already exists in your dataset, please choose its index, otherwise, just check the Add a new reference channel and one new channel with 0s everywhere will be added as the last channel of your dataset. For EGI systems it's already assumed that this channel does not exist, hence one is created.
6. You can select or deselect the EOG regression (It is recommended to select it). If you choose Other... for your EEG system then you need to specify the list of EOG channels as well. In the case of EGI automagic already knows the EOG channels and you don't need to specify anything. The list of EOG channels must be integers seperated by space or comma, e.g. 1 32 8 14 17 21 25 125 126 127 128
7. Set the downsampling rate on the manual rating panel. The downsampling only affects the visual representation of your data. A higher downsampling rate will shorten loading times. In general, a downsampling rate of 2 is a good choice.
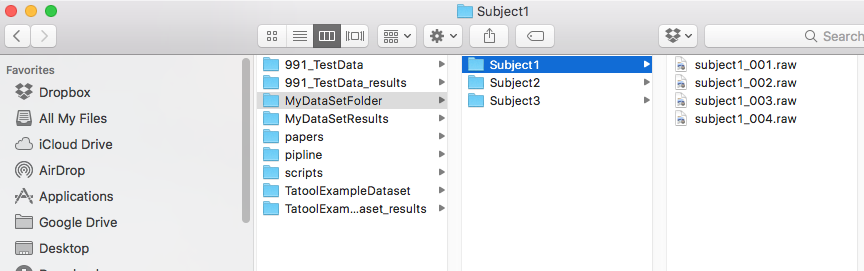
8. Specify the path of your data folder. Automagic will scan all folders in your data folder for data files. Files and folders in the data folder will not be altered by Automagic.
- Note: The data folder must contain a folder for each subject (subject folders). Your data folder should not contain any other kinds of folders since this will lead to a wrong number of subjects.
9. Specify the path of your project folder. If the specified folder does not yet exist, Automagic will create it for you. Automagic will save all processed data to your project folder. By default, Automagic opts for your data folder's path and adds _results to your data folder's name, e.g. \PathDataFolder\MyDataFolder_results\
- Note: A subject folder must contain EEG files. Automagic can only load data saved in subject folders. Since subject folders are defined as folders in the data folder, no specific naming is required.
10. Choose your filtering parameters in the Filtering panel.
- Notch Filter: Choose
USif your data was recorded in adherence to US standards (60 Hz). ChooseEUif your data was recorded in adherence to EU standards (50 Hz). - By default a High pass filtering is performed on data. You can change the freuqency or simply uncheck the High pass filtering. You can also choose to have a Low pass filtering. By default there is no Low pass filtering.
11. By clicking on the Configurations... button you can modify additional optional parameters of the preprocessing. This is not necessary, and you can leave it so that the default values are used.
12. Click on Create New in the lower right corner of the project panel to create your new project. If the specified data and project folders do not yet exist, Automagic will now create them for you.
- Note: You cannot alter paths, the filtering, or the downsampling rate after creating your project.
Loading an Existing Project
If you already had created a project with Automagic and for some reasons re-installed your matlab or Automagic app, you can load that project and keep all the information. There are two options to load an existing project. The first option can only be used to open projects that have been created on your system or that have been loaded before:
- Navigate to the drop-down list labelled Select Project.
- Select the project you want to load.
The second option can be used to load any Automagic project:
- Navigate to the drop-down list labelled Select Project.
- Select Load an existing project...
- A browser window will open. Navigate to the existing project...s project folder.
- Select and open the file named
project_state.mat
Merging Projects
To merge any number of existing projects without losing the individual projects, please follow these steps:
- Create a new data folder using Finder (Mac), Explorer (Windows) or your Linux equivalent.
- Create a new project folder using Finder (Mac), Explorer (Windows) or your Linux equivalent.
- For all the projects that you want to merge: Copy the contents from the data and project folders to the new data and project folders.
- Important: Each of your existing project folders contains a file named
project_state.mat. Do not copy these files to your new project folder.
- Important: Each of your existing project folders contains a file named
- In Automagic: Create a new project using the newly created data and project folders.
Adding Data to an Existing Project
If you would like to add some new subjects, or files to your existing project you could use this option.
- Add subject folders to your data folder using Finder (Mac), Explorer (Windows) or your Linux equivalent.
- Refresh the Automagic GUI using one of these options:
- Start or restart Automagic.
- Navigate to the drop-down list labelled Select Project and load (or reload) the project containing new data by clicking on its name.
- The number of subjects and files in both the project panel and the pre-processing panel should now be updated.
Deleting Data from an Existing Project
- Delete subject folders from your data folder using Finder (Mac), Explorer (Windows) or your Linux equivalent.
- Refresh the Automagic GUI:
- Navigate to the drop-down list labelled Select Project and load (or reload) the project containing new data by clicking on its name.
- The number of subjects and files in both the project panel and the pre-processing panel should now be updated.
Deleting a Project
- Click on Delete Project in the lower right corner of the project panel. A dialog box will appear.
- Take responsibility by clicking on Delete.
- Note: This will only delete the file named
project_state.matin the project folder and remove the project from the Automagic GUI. Please use Finder (Mac), Explorer (Windows) or your Linux equivalent to delete your project data and/or project folder.
- Note: This will only delete the file named
Customize Settings
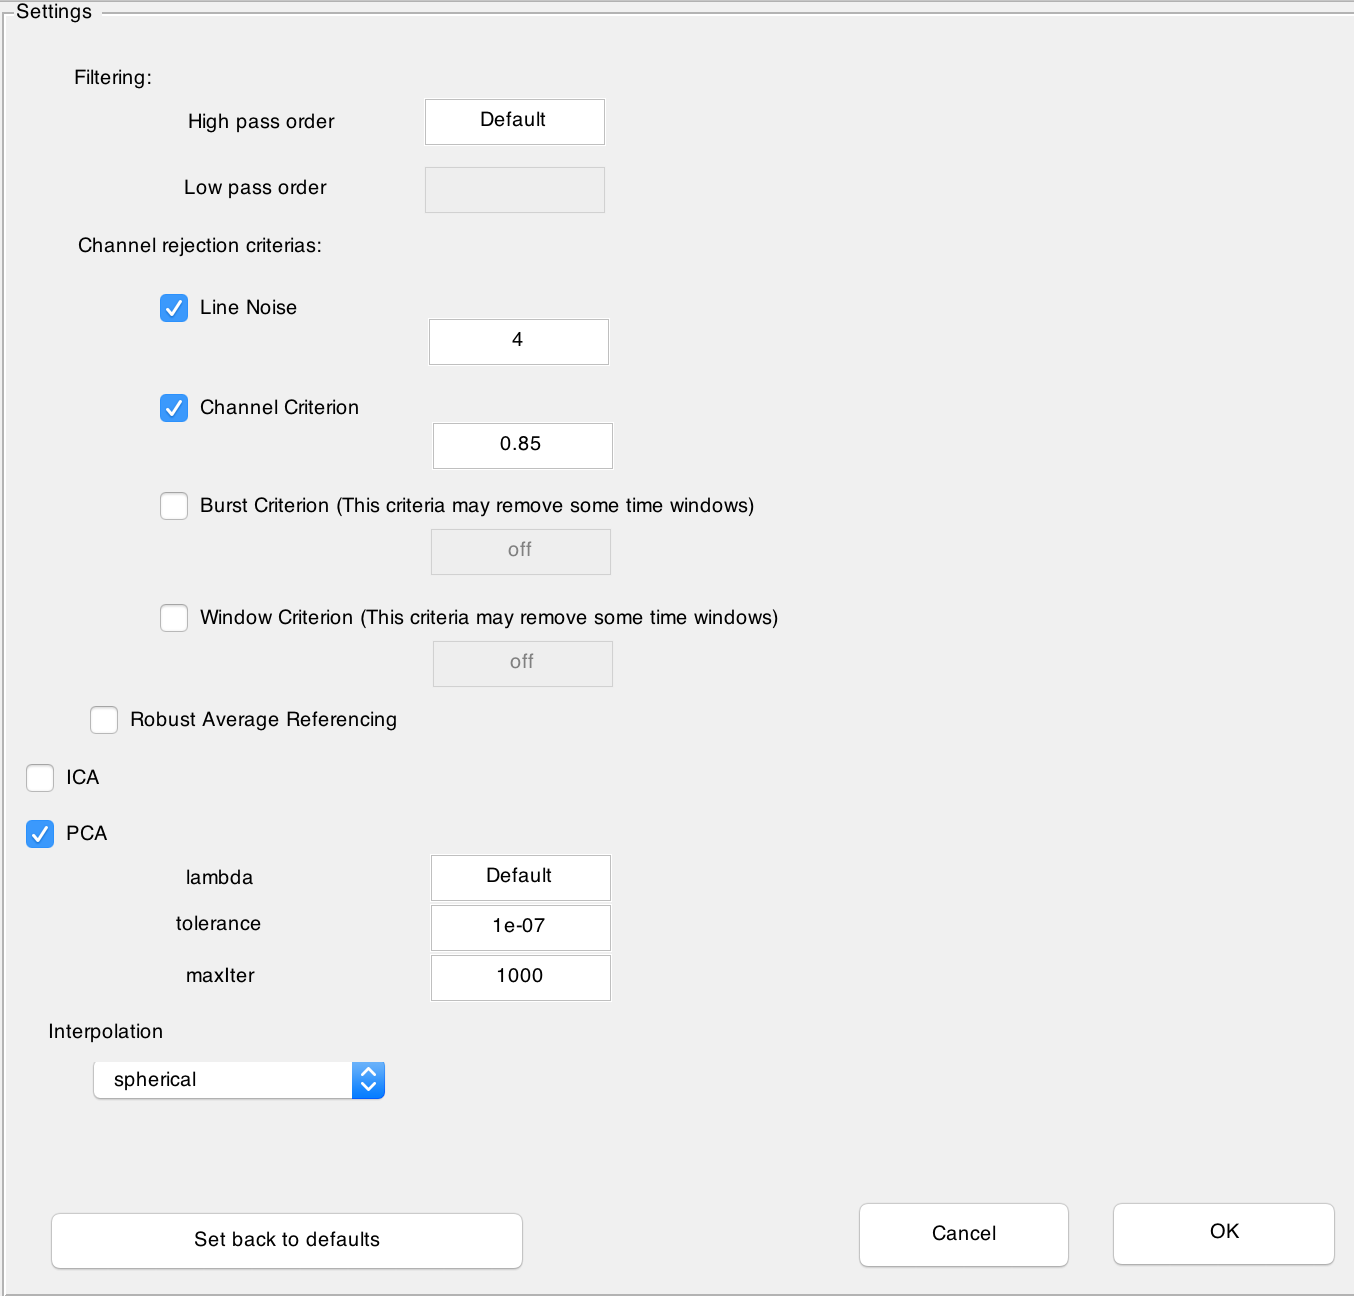
After clicking on Configurations... button a new window is opened where you can customize preprocessing steps:
-
In the Filtering section you can choose the order of the filtering. The default value corresponds to the default value computed by
pop_eegfiltnew.m. -
In the Channel rejection criterias you can select or deselect the four different criterias Line Noise, Channel criterion, Burst Criterion and Window Criterion. The first to criteria are used to detect noisy channels and the last two criterias to remove noisy time windoes. By default only the first two criteria are checked and noisy channels will be marked during the visualisation step, where you can choose to interpolate them. For more information about these criterias, please see
clean_artifacts.mby Artifact Subspace Reconstruction (Mullen et al., 2013).- You can additionally choose to have a channel rejection based on the Robust Average Referencing suggested in PREP pipeline (Bigdely-Shamlo et al., 2016). Note that this is a very time consuming operation.
-
ICA can be selected or deselected. Note that ICA and PCA can not be chosen together at the same time. The ICA uses the algorithm in MARA (Winkler et al., 2011, Winkler et al., 2014).
-
PCA (Lin et al., 2010) can be selected or deselected. The parameters correspond to paramters of
inexact_alm_rpca.m. The default value is where m is the number of channels.
 -
The mode of interpolation can be determined. The default value is spherical.
- Note: The preprocessing parameters can be set only during project creation.

The Pre-Processing Panel
Click on Run to start the pre-processing of your data. This is the first thing you should do after creating a new project or after adding data to an existing project. Pre-processing may include filtering, detection of bad channels, EOG regression, PCA or ICA, and detrending.
Should the project folder already contain files (i.e. should some of the projects data already have been pre-processed), you will be able to choose whether existing files will be overwritten or skipped after clicking on Run.
The Manual Rating Panel
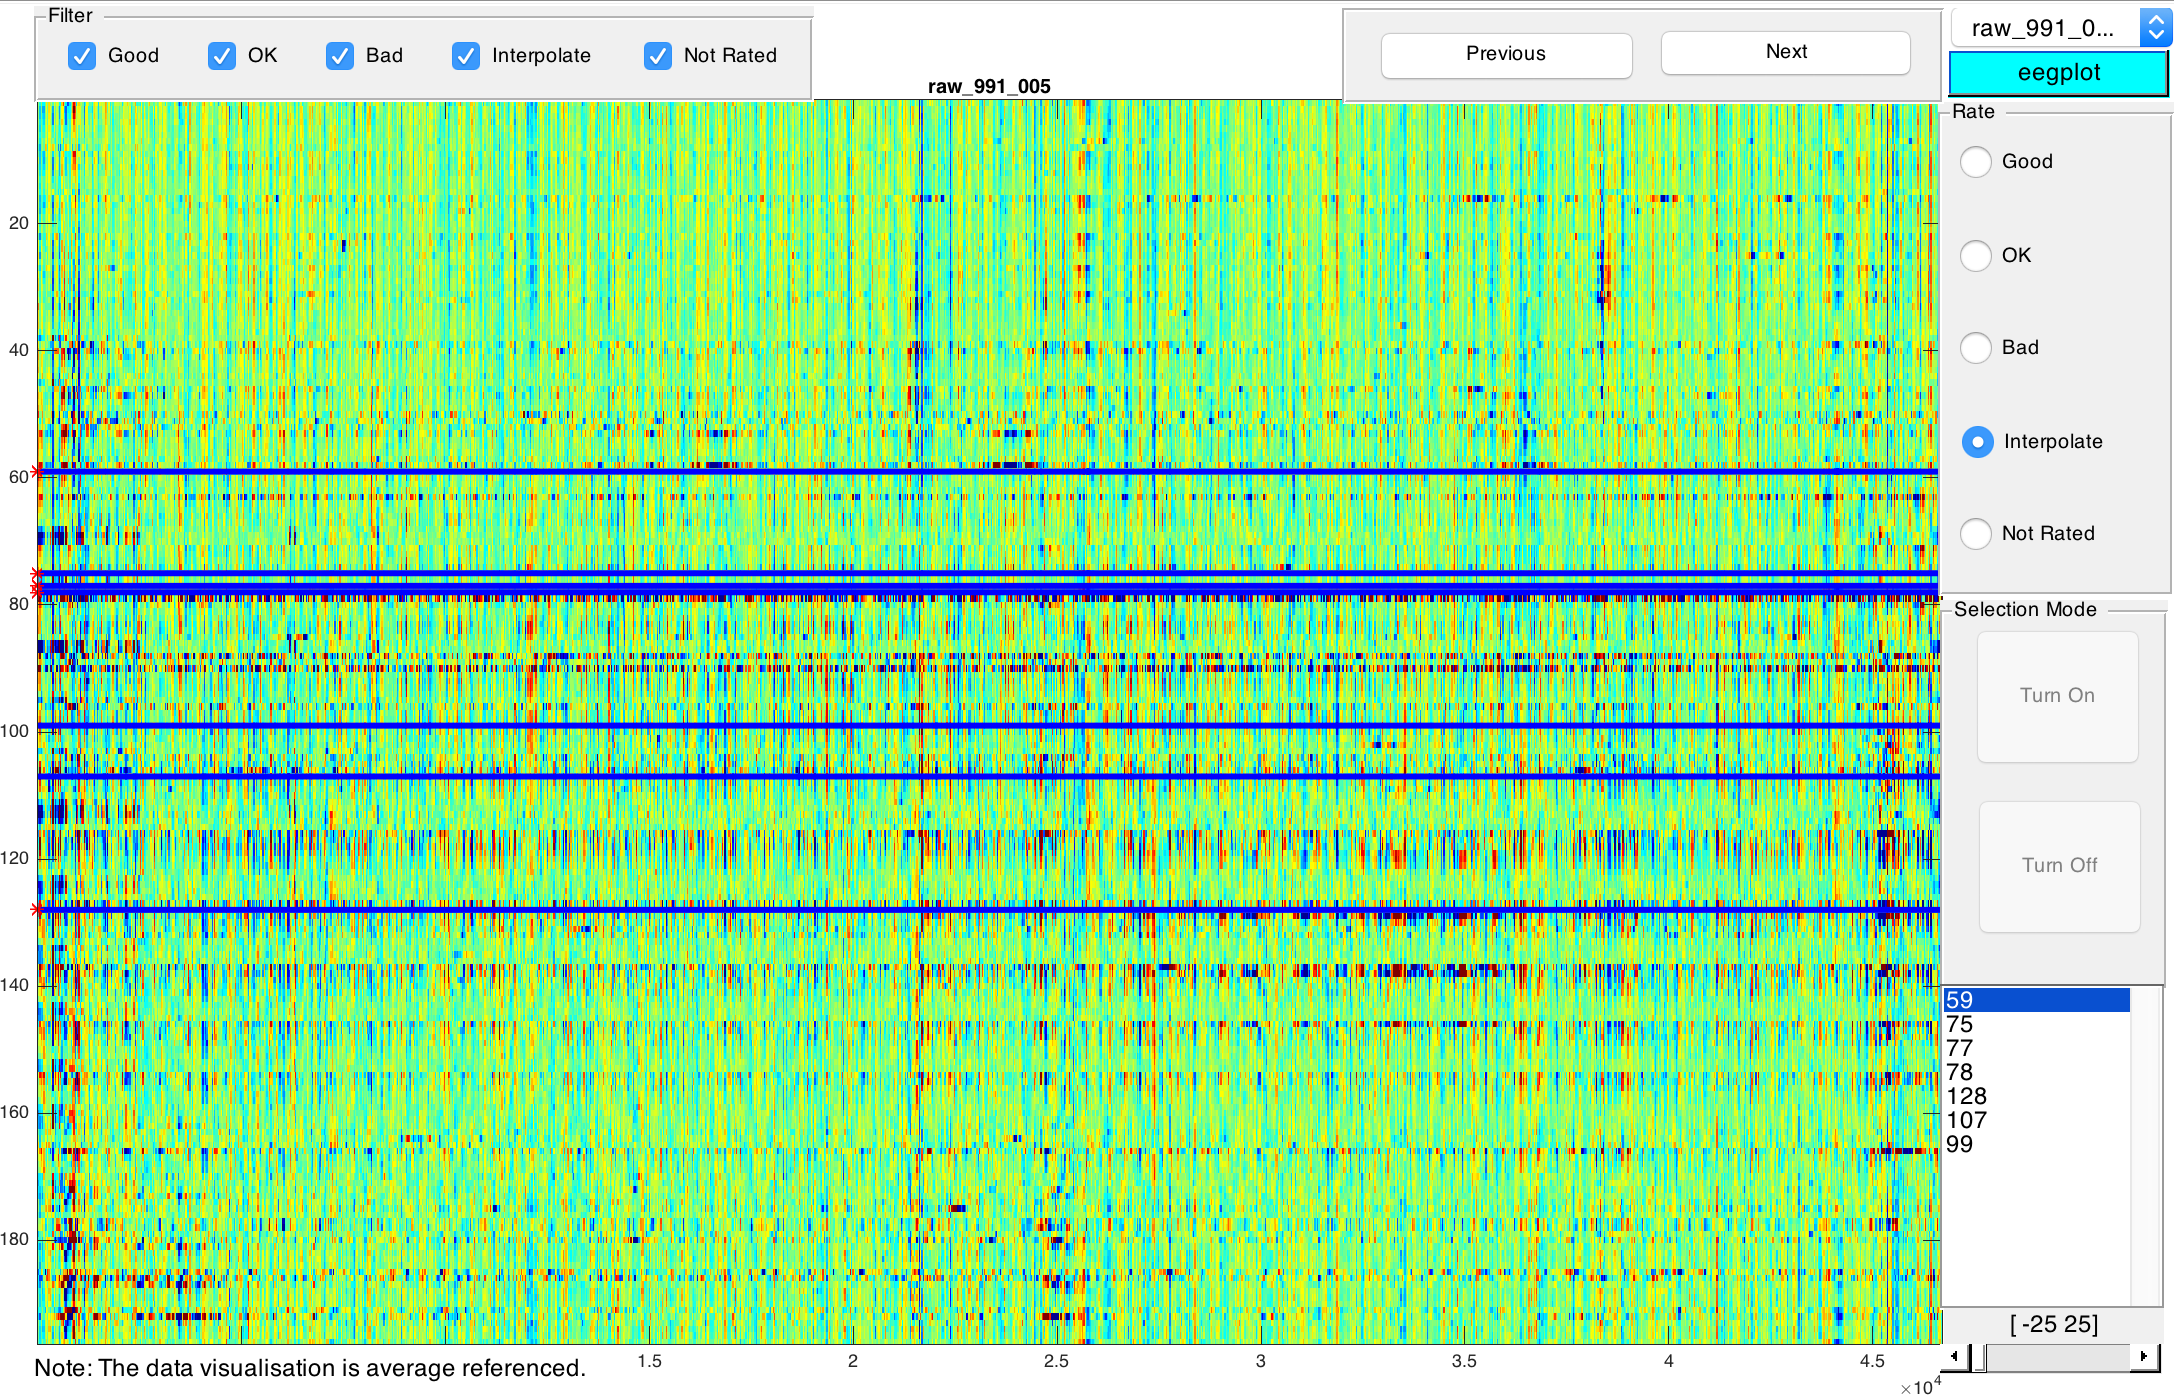
Click on Start... to open the rating GUI.
A visualisation of the currently selected file is displayed. Time corresponds to the x-axis, EEG channels correspond to the y-axis. You can use the tools in the top left corner to e.g. magnify an area or select a specific point of the current visualisation. Use the filters right below the tools to focus on a subset of your files based on their rating. You can navigate between files of the current subset by clicking on Previous and Next or by selecting a file from the drop-down list in the top right corner.
You can rate the quality of the visualised data on the very right. You can choose between Good, OK, and Bad. These ratings are subjective and relative rather than absolute: The overall quality of your data should be used as point of reference. The colouring allows you to rate the quality of your data: Ideally, everything is green. Darker colours signify lower quality, i.e. artifacts etc. As a rule of thumb, horizontal artifacts are worse than vertical artifacts of the same size and colouring. After choosing a rating, you will automatically proceed to the next file. Please note that depending on your data and its signal to noise ratio, the color map may need to be modified. On the very bottom right of the window you can select the range of color map [-X, X] where X can be a positive integer between 25 < X < 150. The default range is [-100, 100].
Detected bad channels during preprocessing are represented by horizontal lines which are darker than their surroundings. Should you also spot bad channels, please select Interpolate. This will activate selection mode. Manually navigate to bad channels and select them by clicking on them. Click on Turn off after selecting all bad channels. Click on Next to proceed to the next file. In the next step you will start interpolationg these bad channels and finally you can come back to re-rate these files after interpolating all selected channels.
- Note: Only pre-processed files will be shown for rating.
- Note: Manual rating can be interrupted anytime by closing the rating GUI. No data will be lost and you can resume rating later.
2.5.1 Keyboard Shortcuts
Going through every file of a huge dataset and manually inspecting them can be a very cumbersum task. Keyboard shortcuts can be used to accelerate this inspection in rating window. Using keyboard shortcuts you can rate and/or select the next or previous file:
- Next plot: Rightwards arrow
- Previous plot: Leftwards arrow
- Good rate: G key or 1 key
- OK rate: O key or 2 key
- Bad rate: B key or 3 key
- Interpolate rate: I key or 4 key
- Not Rated rate: N key or 5 key
The Interpolation Panel
- Click on Interpolate All to interpolate all channels you selected during manual rating.
- Refresh the Automagic GUI:
- Navigate to the drop-down list labelled Select Project and load (or reload) the project containing new data by clicking on its name.
- Manually re-rate the files that contained bad channels.
- Note that you can select and interpolate bad channels as often as you want in each file.
Further Information
Further information, including a manual about the internal application structure, Automagic as a EEGLab extension and how to run the application from code can be found on https://github.com/amirrezaw/automagic
References
References of used functions in Automagic:
Bigdely-Shamlo, N., Mullen, T., Kothe, C., Su, K. M., & Robbins, K. A. (2015). The PREP pipeline: standardized preprocessing for large-scale EEG analysis. Frontiers in neuroinformatics, 9, 16.
Winkler, I., Brandl, S., Horn, F., Waldburger, E., Allefeld, C., & Tangermann, M. (2014). Robust artifactual independent component classification for BCI practitioners. Journal of neural engineering, 11(3), 035013.